 Skip to main content
You've spent hours perfecting a presentation or a project, only to find that your printer delivers lackluster results—faded colors, streaks, or smudges that mar your hard work.
These are signs that it’s time to replace your color imaging unit. Imagine the relief of crisp, vibrant prints once again filling your workspace without the hassle of troubleshooting every time you hit "Print."
At Strategic Technology Partners of Texas (STPT), we understand these frustrations all too well. With 35+ years of experience servicing printers, we've replaced thousands of color imaging units and ensured smooth operation for our clients.
Today, our seasoned technician, Matthew, will provide expert guidance on replacing the color imaging unit in your Xerox C410/C415 printers. He will take you step by step so you can learn how to perform this tricky maintenance task with ease.
Why Replace Your Color Imaging Unit?
The color imaging unit in your printer plays a crucial role in producing high-quality prints. Over time and extensive use, these units wear out. This leads to faded colors, streaks, or even complete print failures. Regular maintenance and timely replacement of components like the imaging unit are essential to maintain print quality and prolong your printer's lifespan.
For other maintenance tutorials on the Xerox C410 and C415 printers, check out the guides below:
- How to Replace the Waste Toner Bottle on the Xerox C410/C415
- Step-by-Step Guide: Replacing Toner in the Xerox VersaLink C410/C415
Now, let’s dive in!
Steps to Replace Color Imaging Unit on Xerox C410/C415
Step 1: Open the Front Cover
The first thing you’ll need to do is open the front cover of your Xerox VersaLink C410/C415 printer.
%20Imaging%20Units%20on%20Xerox%20C410%20%26%20C415_Step%201_0.jpg)
Step 2: Open B Section
Then, open the side cover labeled ‘B’ and swing it open.
%20Imaging%20Units%20on%20Xerox%20C410%20%26%20C415_Step%202_0.jpg)
Step 3: Remove the Side Cover
Inside are two little orange push buttons. Push these buttons to release the white ‘A’ section from the machine. The side cover comes out in one piece.
%20Imaging%20Units%20on%20Xerox%20C410%20%26%20C415_Step%203_1.jpg)
Step 4: Remove the Waste Toner Bottle
With the side cover out of the way, find the waste toner bottle on the bottom. Push the two orange buttons(one above, one below) to release it—be careful as it is spring-loaded. Carefully remove the waste toner bottle and set it aside.
%20Imaging%20Units%20on%20Xerox%20C410%20%26%20C415_Step%204_1.jpg)
Step 5: Remove Toners
Next, remove all four toner cartridges by pushing up on the orange handle of each cartridge. Lift out each one to access the Imaging unit.
%20Imaging%20Units%20on%20Xerox%20C410%20%26%20C415_Step%205_1.jpg)
Step 6: Remove the Old Imaging Unit Kit
With the toners removed, it's time to remove the imaging unit kit. Lift both orange handles located on the sides of the unit and pull them straight out from the machine until it stops. Do not force it.
%20Imaging%20Units%20on%20Xerox%20C410%20%26%20C415_Step%206_1_1.jpg)
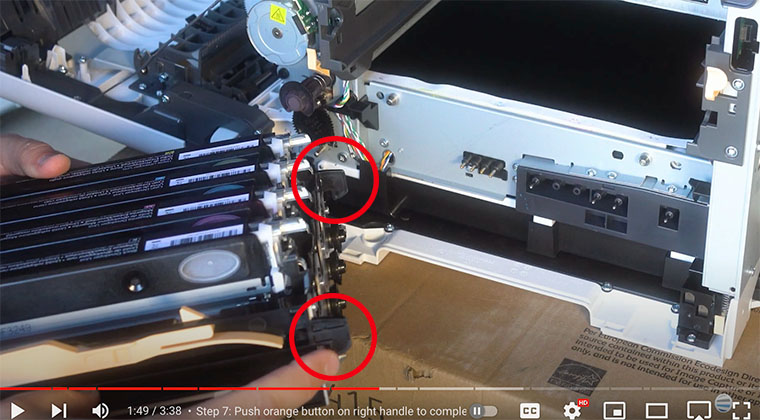
Then, find two long handles on the sides of the kit. Grab these, then press the orange button on the right side of the kit with your thumb to completely release the imaging unit kit. Slide the kit all the way out.
%20Imaging%20Units%20on%20Xerox%20C410%20%26%20C415_Step%206_2_1.jpg)
Step 7: Insert New Imaging Unit Kit
With your new imaging unit kit, locate the small black hooks on each end of the unit.
Ensure you slide the black hooks on each end of the imaging unit into the grey slides inside the printer.
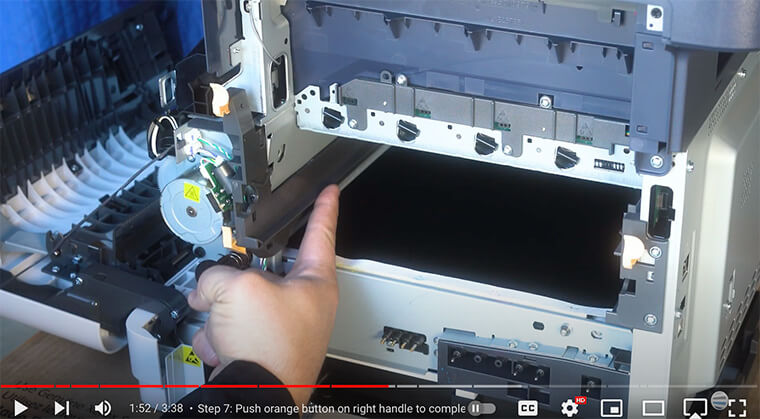
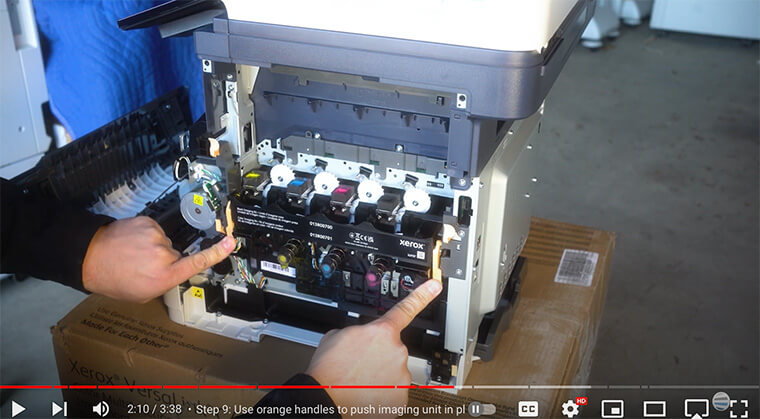
Now insert the new Imaging unit into the printer until the right side clicks. Then, use the orange handles to push the imaging unit all the way in until it clicks it into position.
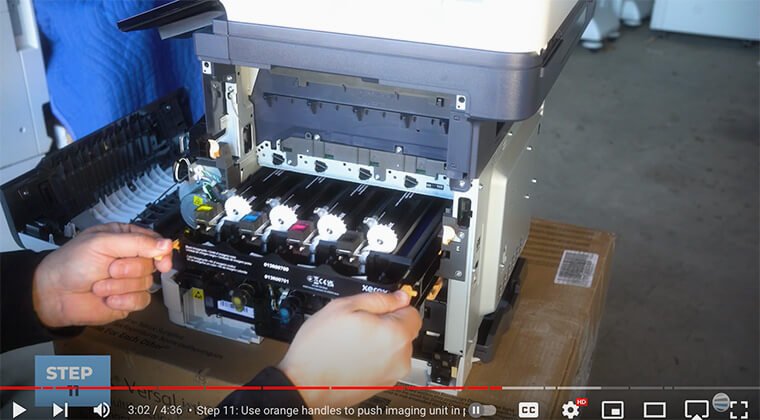
Swing the orange handles down once you’re done to lock it in place.
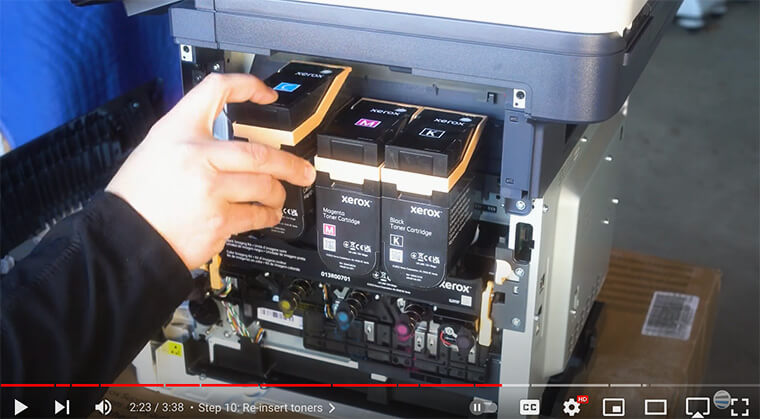
Step 8: Re-insert Toners
Re-insert the toner cartridges by pushing them down until you hear a click.
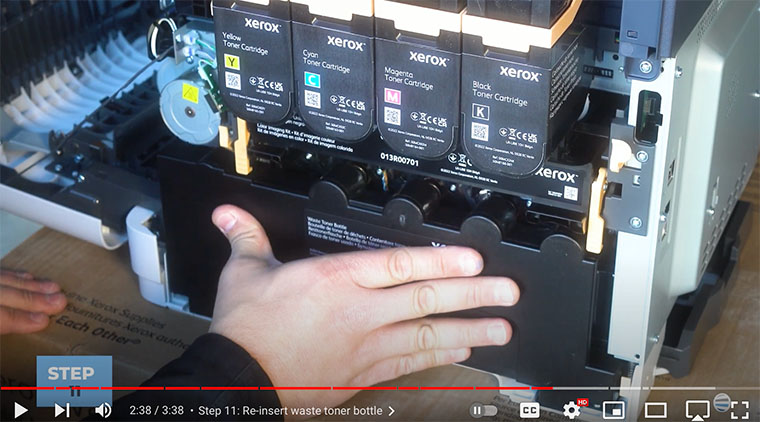
Step 9: Re-Insert Waste Toner Bottle
To reinstall the waste toner bottle, align the four springs with the matching color holes on the waste toner bottle.
%20Imaging%20Units%20on%20Xerox%20C410%20%26%20C415_Step%2011_0.jpg)
Then, push the bottle back into its position until the orange tabs lock securely.
Step 10: Re-assemble the Printer
With all components securely in place, re-install the side cover by aligning the white claws and swinging it up until it clicks. Then swing the white panel labeled ‘A’ up until it clicks.
%20Imaging%20Units%20on%20Xerox%20C410%20%26%20C415_Step%2012_1.jpg)
Finally, close the B panel and the front cover to complete the task.
Congratulations! You got through this task and successfully replaced your color imaging unit.
The Importance of Replacing Your Color Imaging Unit
Faded color prints and overall lower print quality indicate that your color imaging unit is likely worn out. Ignoring these signs not only compromises your print quality but can also lead to costly repairs or premature printer replacement.
A worn-out imaging unit can cause a range of issues, including:
- Color Fidelity Loss: Faded or inaccurate colors can distort your prints, impacting the overall visual appeal and professionalism of your documents.
- Print Consistency Problems: Streaks, lines, or blotches on prints disrupt the smoothness and clarity of your documents, affecting readability and aesthetics.
- Workflow Disruptions: Printer downtime due to imaging unit issues can disrupt your workflow, leading to delays in important tasks and projects.
By proactively replacing your color imaging unit following manufacturer recommendations or at the first signs of deterioration, you can enjoy several benefits.
Not only will you improve print quality with vibrant colors, crisp text, and smooth graphics, but you'll also extend your printer's lifespan, saving you from premature replacements and downtime.
Additionally, a reliable printer means you don’t have to worry about work interruptions that can prevent you from meeting deadlines and maintaining productivity levels.
In short, replacing your color imaging unit is a smart investment in the long-term performance and reliability of your Xerox C410/C415 printer.
If you want to learn about more ways to maintain a healthy printer, check out our blog on eight tips to increase the lifespan of your printer or copier.
Ready for More Tips?
Ready to take charge of your printer's performance and elevate your printing experience? Subscribe to The Printing Workshop YouTube channel for more tutorials, maintenance tips, and expert insights. By subscribing, you'll gain access to a wealth of resources designed to empower you to manage your printers effectively, saving time, costs, and headaches in the long run.
Additionally, check out our Learning Center for more insightful guides and printer-related topics.
If you’re having a difficult time fixing your printer issue, don’t hesitate to contact us. Our printer technicians are ready to help you find a solution.
