It happens all the time: you have a big project coming up that requires a lot of printing, but you notice that your printer is low on toner a few days beforehand.
Of course, you’re busy and forget all about it until the day before your project is due to be printed. You try to start printing, and the machine alerts: you need to replace your printer toner now.
Your machine won't work until the toner is replaced, so you have to replace the printer toner cartridge before you can start your print job.
Immediately, you panic. You’re not sure how to replace the printer toner on your Xerox machine, and you don’t have any time to spare to figure it out.
That’s where our printer experts at STPT come in.
Toner is an important part of the printing process. If your toner isn’t replaced on time, then the quality of your prints can be impacted, and you may end up giving yourself more work to do when you’re already on a tight deadline.
Luckily, the toner installation process isn’t too difficult. Our top-notch service technician, Matthew, is going to walk you through it step-by-step. In this blog, he’ll explain how to quickly change the toner cartridge on several different Xerox printer models so you can get back down to business.
As a service technician at STPT, Matthew simplifies printer maintenance. His how-to quick printer fixes on YouTube have been a big hit, so he’s put together this article to provide a quick, easy-to-read tutorial for those of you who prefer written directions.
Take the pressure off by trusting our STPT printer specialists to help you through it. With almost 40 years in the business, our team has the expertise to make the replacement process quick and easy for you.
For more hands-on help or to ask about our service agreements or automatic toner shipments,
Quick Toner Replacement for a Xerox AltaLink B8100 or C8100 Series Printer
Toner is a powdery substance applied to paper to create an image when you print or copy on a laser machine. Laser printer toner is usually contained within an easy-to-use cartridge to keep things from getting messy.
In this how-to guide, I’ll explain how to replace toner cartridges for the following compatible Xerox printer models:
• AltaLink B8145
• AltaLink B8155
• AltaLink B8170
• AltaLink C8130
• AltaLink C8135
• AltaLink C8145
• AltaLink C8155
• AltaLink C8170
If you need to know when to change your toner or which toner is best for your machine, then check out some of our other blogs on the topic:
• How Long Does Toner Last?
• Auto Toner or Buying My Own: Which Is Right For Me?
Let’s uncomplicate printer maintenance by walking through toner replacement. You can follow the process by reading the written instructions provided below (with pictures) or you can watch the video linked at the top of the blog.
Part One: Open the Front Cover of Your Machine to Locate Toner
We will be walking though toner replacement on a monochrome or black-and-white printer. However, the Xerox AltaLink B8100 and C8100 color models are set up the exact same way as the black-and-white printers. The additional color toner cartridges are located under the front cover and are removed the same way.
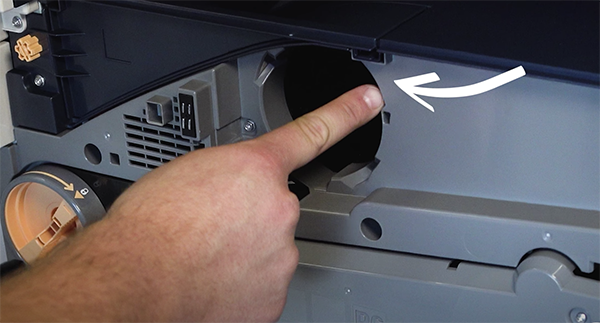
1. Open your printer’s front cover. The toner is located centrally at the top. We’ve indicated its location with an arrow on the picture below.

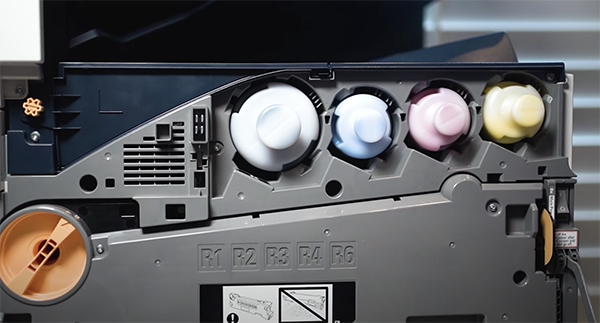
On a color Xerox printer model, the inside of the front cover will look like this:

2. After locating your toner cartridges under the front cover on your printer, use the small knob on the end of the toner cartridge to pull it out.
Part Two: Insert New Toner Into Your Printer
1. Take your new toner cartridge out and prepare to insert it into the toner slot on your machine.
2. Place it back in the box to reduce mess. Environmental sustainability is important to STPT, and we know it is important to you too, so don’t forget to recycle your used toner cartridge with a program like Xerox Green World Alliance.
3. Tip: shake your new toner to mix it well before inserting.
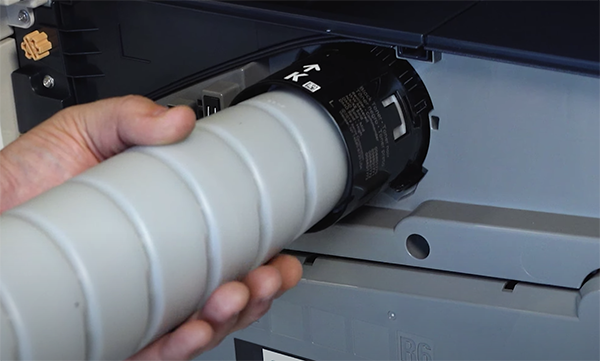
4. To insert the new toner, you need to locate and pay attention to the tabs on the black top of the cartridge:

5. The tabs should line up with these small holes on the face of the slot:

6. Line up the tabs with the correct holes on the face of the printer and slide the new toner in.

7. Make sure the toner locks in with a click before finishing up.
8. Close the front cover on your printer, and you’re good to go!
Even though toner cartridge replacement sounds complicated, the process is pretty simple. Within a few minutes, you should be done with your replacement, and you can get back to work without losing too much time.
No one wants to have projects back up while they try to figure out how to replace parts or perform routine maintenance.
Following these instructions for toner replacement will ensure you don’t get bogged down while trying to make a quick replacement. You can find more helpful how-to blogs on our learning center.
Need Another Quick Printer Fix?
If you want to make your printer’s maintenance quicker and easier, check out our YouTube channel.
The Printing Workshop gives you free access to all our YouTube video tutorials. Let our service technicians and print experts walk you through simple tech solutions for your Xerox printer.
Have a Problem with Your Copier Printer that isn’t a quick fix? Reach out to us. We’d love to help.
