 Skip to main content
If your Xerox VersaLink C625 has started throwing up maintenance alerts, or you’ve noticed streaks, smudges, or faded black text, it’s probably time to replace the black imaging kit. You might be asking: What is that? Can I do it myself? Do I really need to fix it now?
The short answers: It's a key part of your printer, yes, you can do it yourself, and yes, you need to handle it before your print quality takes a nosedive.
At Strategic Technology Partners of Texas (STPT), we’ve serviced thousands of Xerox printers just like yours, and we've replaced just as many black imaging kits. It's a simple repair when you know what you're doing, and it can save your business time, money, and a lot of print headaches.
In this tutorial, you’ll follow Matthew, one of our most experienced technicians, as he shows you exactly how to remove and replace the black imaging unit inside your VersaLink C625.
By the end of this blog, you’ll know:
- What the black imaging kit does
- How it’s different from the color imaging kit
- When to replace it—and why it matters
- Every step to complete the swap safely and correctly
Let’s get started.
Color Imaging Kit vs. Black Imaging Kit: What’s the Difference?
Before we get into the how-to, let’s clear up some confusion.
There are two styles of imaging kits: one is for black-only printing, and the other is for color printing. The black imaging kit includes only the black insert, while the color imaging kit comes with a completely new tray.
That means the black-only imaging kit is a simpler part, it’s just the photoconductor for black toner, no tray, no extras. The color imaging kit, on the other hand, is more complex. It includes a full tray replacement for cyan, magenta, yellow, and black imaging units.
Today, we’re focusing only on the black unit, which lives inside the tray and can be swapped out on its own.
Why You Need to Replace the Black Imaging Kit
The black imaging kit handles the transfer of black toner onto the paper. It’s responsible for all the text and black-and-white elements in your prints. Over time, the photoconductor drum inside wears down. That leads to:
- Faded or ghosted prints
- Streaks, lines, or blotches
- Frequent paper jams or system errors
If your print quality is dropping, or your printer is telling you it’s time, don’t ignore it. We’ve seen companies push their luck, only to end up with more expensive damage later on.
Step-by-Step: How to Replace the Black Imaging Kit on a Xerox VersaLink C625
Here’s the full breakdown of the replacement process, just like Matthew shows in the video:
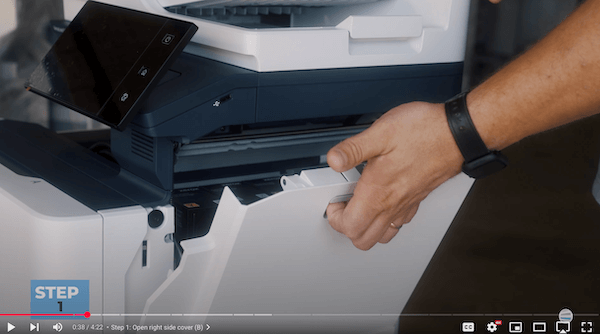
Step 1: Open the Right Side Cover (Cover B)
Find the cover on the printer's right side labeled ‘B’. Raise the gray handle, then swing the panel out and up.
Step 2: Remove the Waste Cartridge
Beneath the toner cartridges is the waste cartridge marked ‘B1’. Use your index fingers on the two orange holes and pull it straight out.

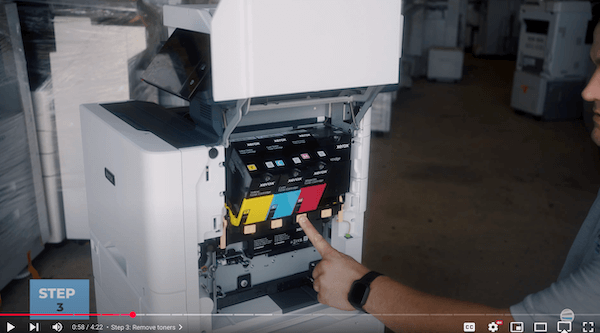
Step 3: Remove the Toner Cartridges
To unlock the cartridges, press the orange buttons at their bases and allow them to swing out. After that, simply remove them.
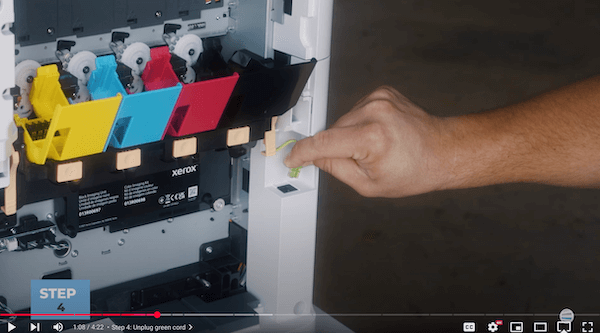
Step 4: Unplug the Green RJ11 Cord
Locate this at the rear of the unit. Please unplug it carefully before proceeding.
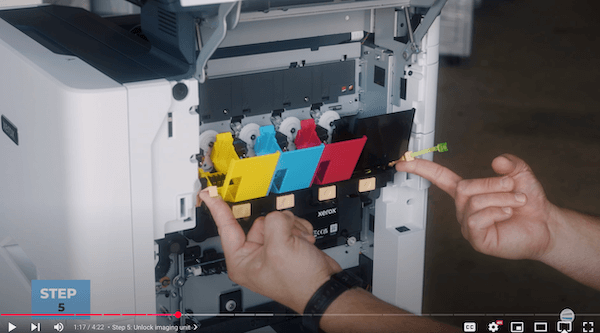
Step 5: Unlock the Imaging Unit
Find the two orange handles on either side of the toner cartridge slot. Raise both handles to unlock the unit.
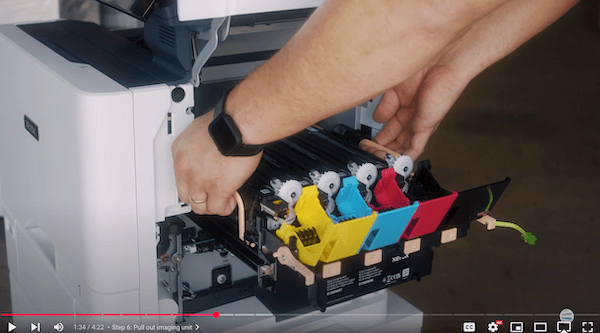
Step 6: Pull Out the Imaging Unit
Hold the orange handles and pull directly outward until you reach the locking point of the drawer. After that, grab the side handles and pull the drawer the rest of the way out.
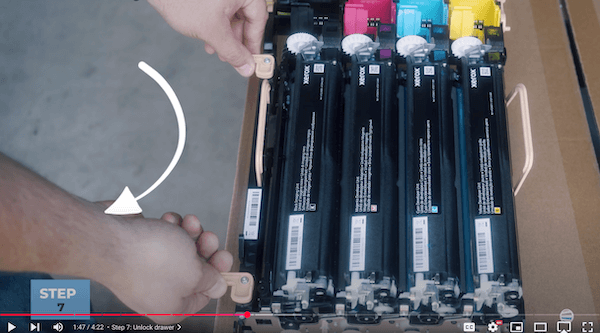
Step 7: Unlock the Drawer
Place your color imaging kit on a flat, stable surface. Rotate the orange locks clockwise to unlock the internal assembly.
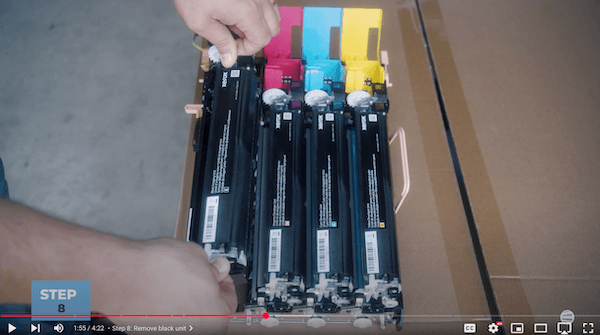
Step 8: Remove the Black Imaging Unit
Lift the black imaging unit straight up from the color imaging tray.
Step 9: Insert the New Black Unit into the Color Tray
Place the new black unit into the color imaging kit by inserting it into the correct slot.
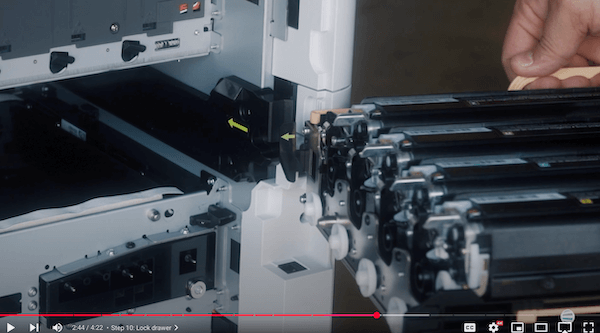
Step 10: Lock the Drawer
Rotate the orange handles counterclockwise until they click into position.
Step 11: Reinsert the Drawer into the Printer
Align the green arrows on the color imaging kit with those inside the printer to guide it in correctly. Use the orange handles to fully insert the color imaging kit.
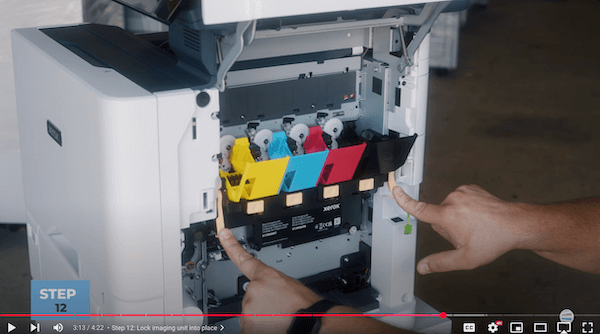
Step 12: Lock the Imaging Unit Into Place
Once the drawer is all the way in, it will drop into place. Swing the orange handles down to lock it.
Step 13: Plug the RJ11 Cord Back In
Reconnect the green phone cord in the back of the unit.
Step 14: Reinsert the Toner Cartridges
Make sure the labels face outward. Set each one into place until it clicks.
Step 15: Reinstall the Waste Cartridge
Push it in straight using your thumbs until it locks in.
Step 16: Close the Right Side Cover (B)
Line up the bottom first, then swing the top in until it clicks shut.
Why Replacing the Black Imaging Kit Matters
Let’s be clear: your printer depends on this component for all of its black print output. If you skip or delay this replacement, here’s what can happen:
- Text becomes unreadable
- Customers receive poor-quality materials
- Your team wastes time reprinting or troubleshooting
- Your internal hardware suffers more wear and tear
We’ve helped organizations get back up and running after ignoring this issue, and it’s always more expensive than just replacing the kit in time.
Keep Your Printer in Top Shape
At Strategic Technology Partners of Texas (STPT), we’ve helped thousands of businesses across Texas keep their printers running smoothly, and we want to help you too.
If this guide saved you a service call or helped you avoid a print meltdown, here’s the best thing you can do next:
Subscribe to our YouTube channel: The Printing Workshop.
You’ll find more expert tutorials from Matthew and the STPT team. These include step-by-step guides, troubleshooting tips, and pro maintenance advice. All of these resources will help you get more life out of every printer you own.
Don’t wait for the next error message. Be ready for it. Subscribe now.
Need expert help? Contact us, and we will be glad to help you.
