 Skip to main content
If your Xerox VersaLink C625 printer is throwing imaging kit errors, printing streaky or discolored pages, or warning you about a maintenance issue, you're in the right place. It’s likely that your color imaging kit is due for a replacement. This isn’t just a maintenance suggestion. Ignoring it can seriously hurt your printer’s performance and, over time, your team’s productivity. That’s where we come in.
Strategic Technology Partners of Texas (STPT) has serviced thousands of printers across Texas, including this exact issue. We’ve seen what happens when businesses delay replacing their imaging kits: print jobs suffer, frustration builds, and costly repairs become unavoidable.
In this blog, you’ll learn exactly how to replace the color imaging kit in a Xerox VersaLink C625 with no confusion, no tech jargon, and no guesswork. Leading you through the process is Matthew, a seasoned printer technician who’s been fixing machines like yours for years. He's part of our crew at The Printing Workshop, and he knows his way around a Xerox VersaLink.
By the time you finish this post, you'll:
- Understand what the color imaging kit is and why it matters
- Know when and why it needs to be replaced
- Be able to confidently follow every step to swap it out
- Save time, avoid mistakes, and keep your printer running like it should
Let’s get into it.
What Is the Color Imaging Kit?
Your Xerox VersaLink C625 doesn’t just print with toner. It needs a color imaging kit to transfer that toner onto the page accurately and cleanly. Think of the imaging kit as the middleman between your toner cartridges and the paper. It ensures your documents come out with crisp graphics and clean text.
Specifically, the color imaging kit includes components for cyan, magenta, yellow, and black (CMYK) printing. It contains the photoreceptors and transfer systems needed for these colors to combine properly on each page.
Over time, these parts wear out, just like brake pads on a car. When that happens, you’ll notice defects in print quality or your printer will alert you to replace the kit.
In the case of the Xerox VersaLink C625, there are two different imaging kits:
- The black-only imaging kit, which containsjust the black photoreceptor insert.
- The color imaging kit, which includes a completely new tray that houses all four imaging components: cyan, magenta, yellow, and black.
Why and When Should You Replace It?
Most Xerox printers will alert you when the imaging kit is nearing the end of its life. You may see error messages or warnings on the display. You might also notice:
- Faded or streaky colors
- Blotchy or inconsistent graphics
- Strange noises or error codes
If your prints don’t look like they used to, or your machine is flagging the kit, it’s time to swap it out.
Ignoring this can lead to:
- Dirty, unprofessional-looking documents
- Damage to other internal parts
- Downtime when you can’t afford it
At STPT, we’ve helped thousands of businesses prevent these issues. It’s a routine fix when you know what you’re doing, and now, you will.
Step-by-Step: How to Replace the Color Imaging Kit on a Xerox VersaLink C625
Here’s the full breakdown of the replacement process, just like Matthew shows in the video:
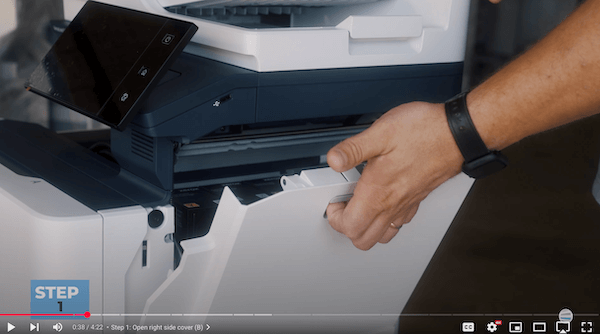
Step 1: Open the Right Side Cover (Cover B)
Locate the cover on the right side of the printer labeled ‘B’. Lift the gray handle, then swing the panel outward and upward.
Step 2: Remove the Waste Cartridge
Underneath the toner cartridges is the waste cartridge, labeled ‘B1’. Place your index fingers on both orange holes and pull straight out.

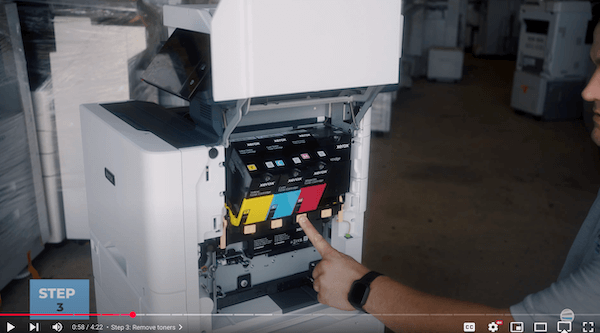
Step 3: Remove the Toner Cartridges
Press the orange buttons at the base of each cartridge to unlock them and let them swing them out. Then, remove them.
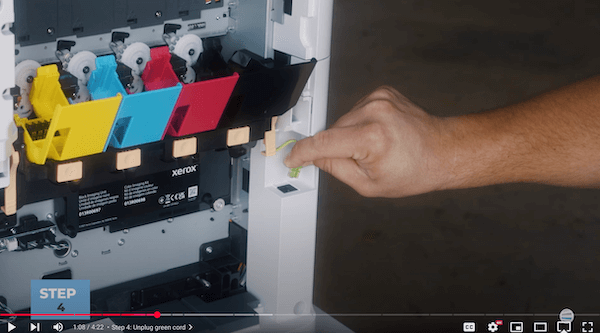
Step 4: Unplug the Green RJ11 Cord
This is found in the back of the unit. Carefully unplug it before moving forward.
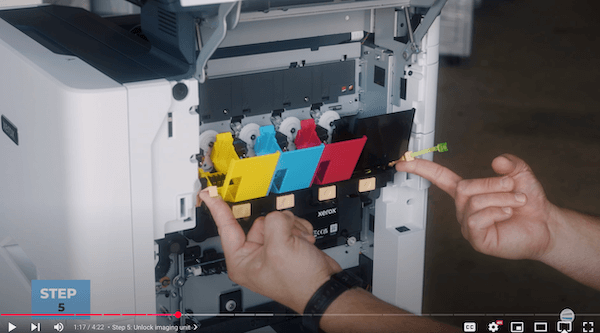
Step 5: Unlock the Imaging Unit
Locate two orange handles on both sides of the toner cartridge receptor. Lift both orange handles until the unit unlocks.
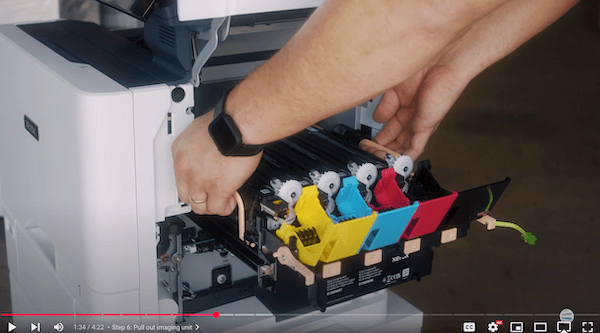
Step 6: Pull Out the Imaging Unit
Grab those same orange handles and pull straight out until the drawer hits the locking point. Then grab the side handles and pull it the rest of the way out.
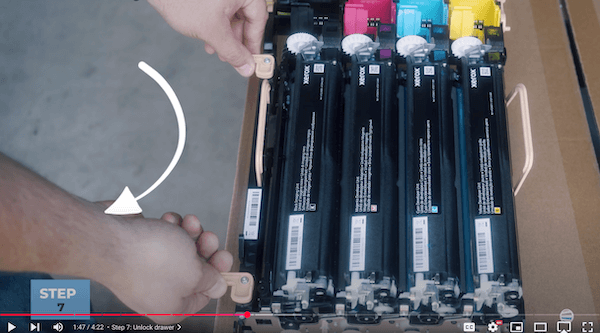
Step 7: Unlock the Drawer
Set your color imaging kit on a flat, stable surface. Turn the orange locks clockwise to release the internal assembly.
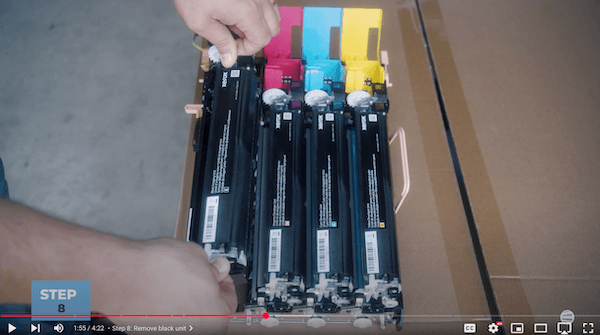
Step 8: Remove the Black Imaging Unit
Lift it straight up from the color imaging tray.
Step 9: Insert the Old Black Unit into the New Color Tray
The new kit comes with a new tray. Transfer the old black unit into it by fitting it into the correct slot.
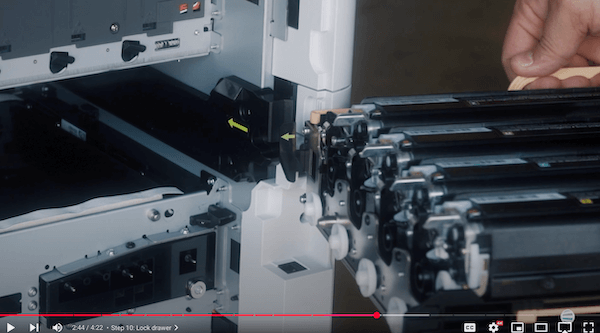
Step 10: Lock the Drawer
Turn the orange handles counterclockwise until they snap into place.
Step 11: Reinsert the Drawer into the Printer
Match the green arrows on the color imaging kit and inside the printer to guide it in correctly. Use the orange handles to push the color imaging kit all the way in.
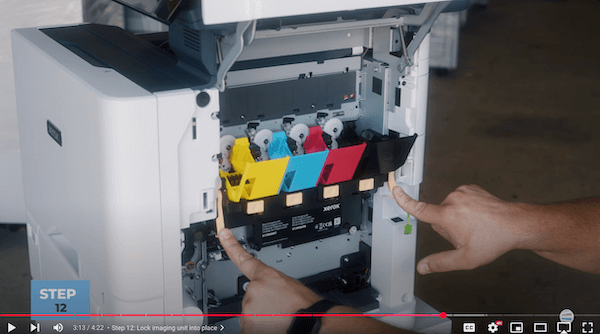
Step 12: Lock the Imaging Unit Into Place
Once the drawer is all the way in, it will drop into place. Swing the orange handles down to lock it.
Step 13: Plug the RJ11 Cord Back In
Reconnect the green phone cord in the back of the unit.
Step 14: Reinsert the Toner Cartridges
Make sure the labels face outward. Set each one into place until it clicks.
Step 15: Reinstall the Waste Cartridge
Push it in straight using your thumbs until it locks in.
Step 16: Close the Right Side Cover (B)
Line up the bottom first, then swing the top in until it clicks shut.
Why This Replacement Matters
Letting a worn-out imaging kit stay in your printer is like running a marathon with no water. It leads to:
- Reduced image quality
- Paper jams and errors
- Higher toner waste and costs
- Reduced lifespan for your printer
If you rely on your Xerox VersaLink C625 to produce client-facing materials, marketing handouts, or internal reports, this matters. Clean, sharp printing reflects on your business.
Even more importantly, a failing imaging kit can trigger other hardware problems. Fixing those costs far more than replacing the kit, and can mean serious downtime.
This 10-minute job saves you all that.
Stay Ahead of Printer Problems
Replacing the color imaging kit in your Xerox VersaLink C625 isn’t hard when you have the right help. With Matthew’s expertise and our step-by-step guide, you’ve now got everything you need to tackle it like a pro.
At Strategic Technology Partners of Texas (STPT), this is what we do. We’ve helped thousands of businesses across Texas keep their printers running smoothly, and we want to help you too.
Want More Expert Guidance Like This?
Subscribe to our YouTube channel, The Printing Workshop.
You’ll get access to more tutorials, pro-level tips, and smart printer maintenance strategies to keep your devices humming.
Subscribe today and stay ahead of your printer problems.
Need expert help? Contact us, and we will be glad to help you.
