 Skip to main content

If you’re wondering what a transfer belt cleaner is, what the part does, where it is located, or whether you can replace it yourself without making a mess or damaging something inside the copier, this guide is for you.
The transfer belt cleaner removes excess toner from the transfer belt during the printing process. Because it collects toner and experiences normal wear over time, it eventually reaches the end of its service life and needs to be replaced. Your Xerox AltaLink will typically notify you when that time comes.
At Strategic Technology Partners of Texas (STPT), we have serviced thousands of Xerox printers and copiers and handled this type of maintenance issue thousands of times. Our technicians work with these devices every day, helping businesses keep their equipment running reliably and avoid unnecessary downtime.
In this guide, our printer technician Matthew will show you how to replace the transfer belt cleaner on a Xerox AltaLink C8000 Series copier. The replacement process is also the same for the Xerox AltaLink B8000 Series.
By the end of this article, you will know where the transfer belt cleaner is located, how to remove the old unit without spilling toner, how to align and install the replacement correctly, and how to secure everything before you start printing again.
Table of Contents
- What Is a Transfer Belt Cleaner?
- When Should You Replace the Transfer Belt Cleaner?
- How to Replace the Transfer Belt Cleaner
- Common Mistakes to Avoid
- Quick Recap
- FAQ
- Why Proper Replacement Matters
Short Answer: Transfer Belt Cleaner Replacement on Xerox AltaLink C8000/B800 Series
To replace the transfer belt cleaner on a Xerox AltaLink C8000 or B8000 Series copier, open the front cover, unlock the R6 cleaner, use the included plastic bag to contain loose toner, remove the old cleaner, align and install the new one, tighten the locking knob, and close the copier.
What Is a Transfer Belt Cleaner?
A transfer belt cleaner removes excess toner from the transfer belt after the toner image is transferred during printing.
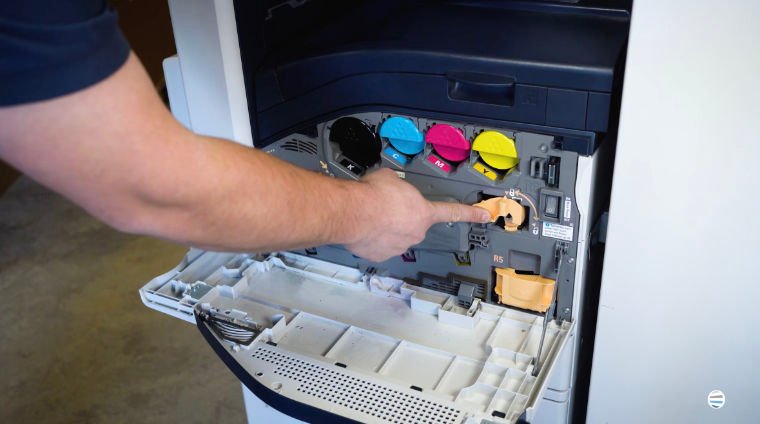
On the Xerox AltaLink C8000 Series, the transfer belt cleaner is identified as R6 and is located on the right side behind the front cover.
As the copier operates, the cleaner collects leftover toner that would otherwise remain on the transfer belt. Because this happens repeatedly, the component wears and fills over time.
When Should You Replace the Transfer Belt Cleaner?
You should replace the transfer belt cleaner when your Xerox AltaLink displays a maintenance message indicating that the R6 cleaner has reached the end of its expected service life.
A worn or full transfer belt cleaner may have trouble removing excess toner effectively, which can eventually contribute to print-quality or toner buildup issues.
It is best to replace the component when the copier prompts you rather than continuing to use it past its recommended life. Doing so helps maintain consistent print quality and keeps the transfer system working as intended.
How Do You Replace the Transfer Belt Cleaner on a Xerox AltaLink C8000 or B8000?
The replacement process involves unlocking the old R6 cleaner, containing the loose toner as you remove it, installing the new unit in the correct orientation, and securing the locking mechanism.
Step 1: Open the Front Cover
Open the copier’s front cover.
The transfer belt cleaner is located on the right side of the machine and is labeled R6.
There’s an orange cover protecting the cleaner’s locking knob.
Step 2: Unlock the Knob Cover
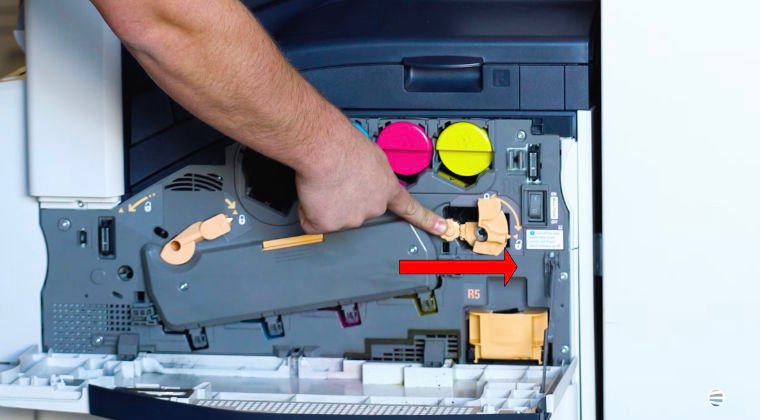
Turn that orange cover clockwise about one-quarter turn.
This exposes the knob you will need to loosen before removing the cleaner.
Step 3: Loosen the Transfer Belt Cleaner Knob
Turn the knob counterclockwise until it releases and pops outward.
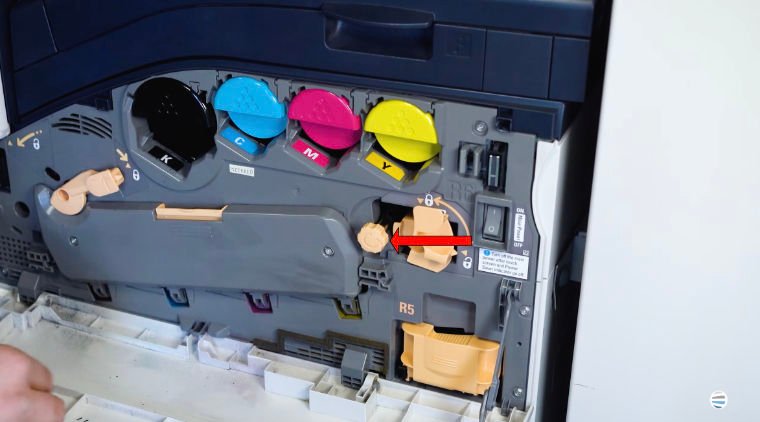
Once the knob has disengaged, the transfer belt cleaner is ready to be pulled out.
Step 4: Begin Pulling Out the Old Transfer Belt Cleaner
Grab the entire assembly and pull straight toward you.
This may require a little force, which is normal. Use one smooth pulling motion rather than jerking or twisting the component.
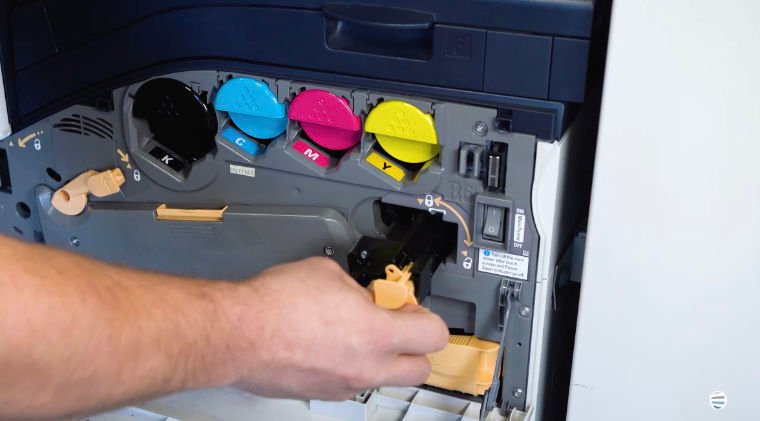
Before removing it completely, stop and prepare the plastic bag included with the new transfer belt cleaner.
Step 5: Use the Plastic Bag to Prevent a Toner Mess
This is one of the most important parts of the replacement.
The old transfer belt cleaner contains loose toner, so removing it without containing that toner can create a mess.
Take the plastic bag from the replacement package and wrap it around the old cleaner while it is still partially inside the machine. Cover the assembly as completely as possible, then finish pulling it out.
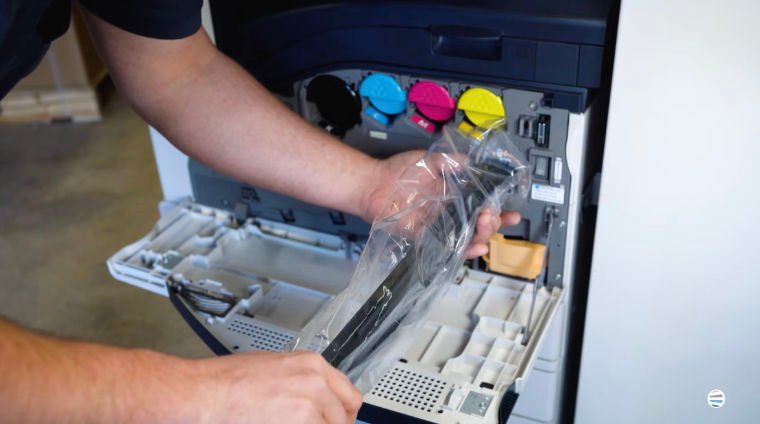
The bag helps contain any loose toner that may escape during removal.
Step 6: Unbox the New Transfer Belt Cleaner
Remove the replacement cleaner from its packaging and take off the protective wrapping.
Before installing it, look for the orange line on top of the cleaner.
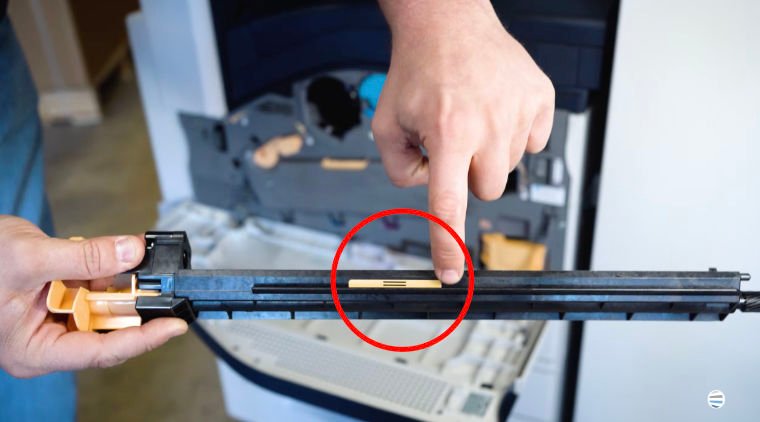
That orange line should face straight upward when you insert the unit.
Also be careful around the clear shield on the cleaner. Avoid bending or damaging it while handling the part.
Step 7: Align the Top Guide
Look at the top of the new transfer belt cleaner.
You will see a guide that lines up underneath the white bracket inside the copier.
Position the cleaner so the orange line remains facing upward, then align the guide underneath that bracket.
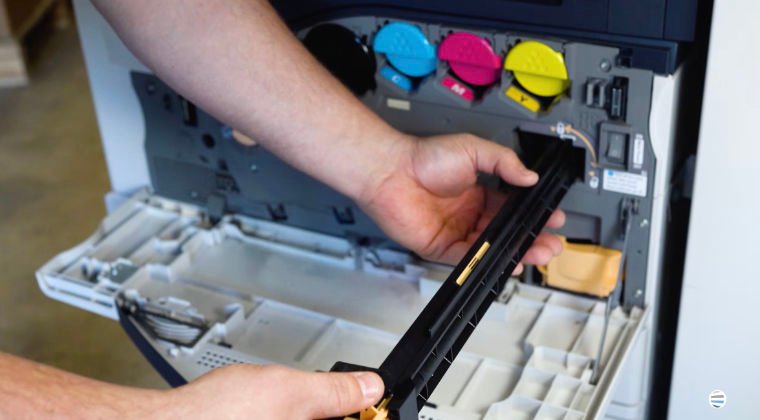
Correct alignment is important because the cleaner needs to slide straight into its operating position.
Step 8: Push the Cleaner Into Place
Once everything is lined up, push the transfer belt cleaner straight into the machine.
It may require some pressure and slight adjustment as you guide it in. That is normal.
Continue pushing straight inward until the cleaner stops.
If it does not move properly, check the guide and orientation rather than forcing it at an angle.
Step 9: Tighten the Locking Knob
While applying light inward pressure on the cleaner, begin turning the small knob clockwise.
Continue until the threads catch.
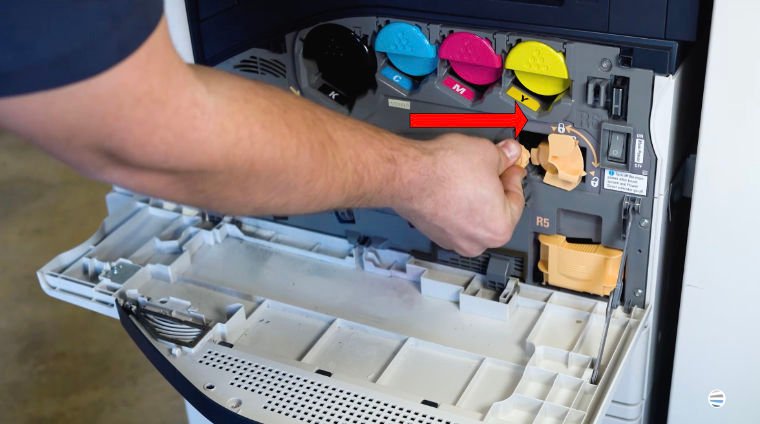
Then continue to turn the knob until it stops. You don’t need to overtighten it. It simply needs to be snug and fully secured.
Step 10: Lock the Knob Cover
Turn the knob cover counterclockwise about one-quarter turn until the arrows line up with the lock symbol.
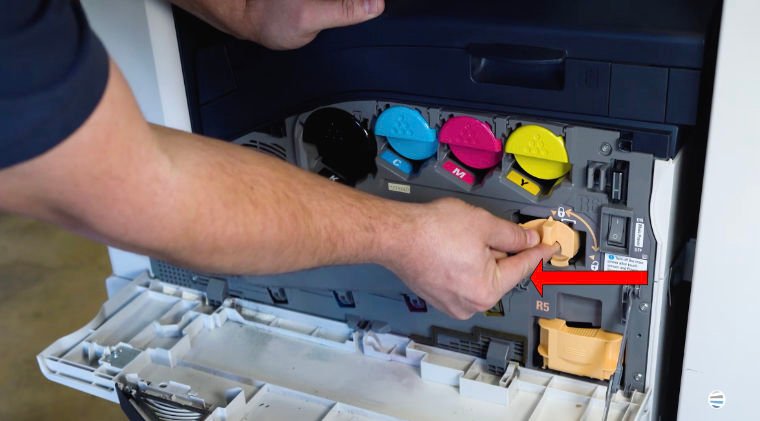
This protects the locking knob and confirms the assembly is secured.
Step 11: Close the Front Cover
Close the copier’s front cover.
Your transfer belt cleaner replacement is now complete, and the machine should be ready to return to normal operation.
Common Transfer Belt Cleaner Replacement Mistakes to Avoid
Removing the Old Cleaner Without the Plastic Bag
The old unit can contain loose toner. Using the included plastic bag as you remove it helps prevent toner from spilling inside the machine or around your office.
Installing the New Cleaner Upside Down
Use the orange line as your orientation guide. It should face straight upward during installation.
Damaging the Clear Shield
Handle the new cleaner carefully and avoid bending, scraping, or pressing against the clear shield.
Misaligning the Top Guide
The guide must fit underneath the white bracket inside the copier. If the unit will not slide in properly, stop and check the alignment.
Overtightening the Knob
The locking knob only needs to be turned until it stops. Excessive force is unnecessary.
Quick Recap
- Open the front cover.
- Locate the R6 transfer belt cleaner.
- Turn the knob cover clockwise.
- Loosen the knob counterclockwise.
- Begin pulling out the old cleaner.
- Wrap the included plastic bag around it to contain toner.
- Remove and unbox the new cleaner.
- Keep the orange line facing upward.
- Align the top guide and slide the cleaner into place.
- Tighten the knob clockwise.
- Lock the knob cover.
- Close the front cover.
FAQ
What does the transfer belt cleaner do?
The transfer belt cleaner removes excess toner from the transfer belt during the printing process so toner does not continue building up on the belt.
Where is the transfer belt cleaner located?
On the Xerox AltaLink C8000 Series, the transfer belt cleaner is labeled R6 and is located on the right side behind the front cover.
When should I replace the transfer belt cleaner?
Replace it when the copier displays a maintenance message telling you the transfer belt cleaner has reached the end of its service life.
Why does the replacement come with a plastic bag?
The bag helps contain loose toner when you remove the old cleaner, reducing the chance of making a mess.
Which direction should the new transfer belt cleaner face?
The orange line on top of the replacement cleaner should face straight upward during installation.
Is the replacement process the same for the B8000 and C8000 Series?
Yes. The replacement process described here applies to both the Xerox AltaLink B8000 and C8000 Series.
Proper Transfer Belt Cleaner Replacement Helps Keep Printing Reliable
Replacing the transfer belt cleaner correctly helps the copier remove excess toner as intended and supports clean, consistent print quality.
The biggest things to remember are to contain the loose toner when removing the old unit, keep the orange line facing upward, align the guide correctly, and secure the locking knob without overtightening it. Taking a little extra care during these steps can help prevent a messy replacement or continued maintenance issues.
For more Xerox repair tutorials and practical printer maintenance tips, subscribe to The Printing Workshop on YouTube.
You will get access to more quick, step-by-step guides from experienced technicians like Matthew.
