 Skip to main content

If you’re noticing streaks, repeating marks, faded areas, or other print-quality problems, it’s probably time to replace your drum.
The drum is an important imaging component that works with toner to create the text and images on your printed pages. Like many other printer parts, drums eventually need to be replaced. Xerox AltaLink printers will typically alert you when a drum reaches the end of its expected life, although declining print quality can also be a sign that something in the imaging system needs attention.
As print vendors, we've serviced thousands of printers and copiers and handled drum replacements thousands of times.
In this guide, our printer technician Matthew will share how best to replace the drum on a Xerox AltaLink C8000 Series. The drum replacement process is the same for the AltaLink B8000 Series as well. By the end, you'll know how to safely remove the old drum, use the protective case to install the new one, clean the LED lens, and avoid damaging the drum during replacement.
Table of Contents
- What Does a Drum Do?
- When Should You Replace a Drum?
- How to Replace a Drum on a Xerox AltaLink C8000 or B8000
- Common Drum Replacement Mistakes
- Quick Recap
- FAQ
- Why Proper Drum Replacement Matters
Short Answer: Replacing Drums on Xerox AltaLink C8000/B8000
To replace a drum on a Xerox AltaLink C8000 or B8000 Series copier, first open the front cover and drum door. Then remove the old drum, use the protective case to guide the new drum into place, clean the LED lens, and securely close and lock the machine.
What Does a Drum Do?
A printer drum is an imaging component that works with toner to create the text and images you see on a printed page.
On the AltaLink C8000 Series, the R1 drum is the black drum, while R2, R3, and R4 correspond to the three colors. Although the B8000 Series is monochrome, the basic drum replacement procedure is the same.
Drums play a key role in creating a printed image, so their condition can affect the quality of your finished documents.
When Should You Replace a Drum?
You should replace a drum when your Xerox AltaLink tells you the drum has reached the end of its expected life and needs replacement.
Watch for print-quality problems too, such as:
- Repeating marks or spots
- Streaks or lines
- Faded areas
- Uneven image quality
- A drum replacement notification
By replacing a worn drum in a timely manner, you ensure your copier keeps producing clean and consistent output.
How Do You Replace a Drum on a Xerox AltaLink C8000 or B8000?
The process to replace the drum is the same for the Xerox AltaLink C8000 and B8000 Series. Be sure to handle the imaging surface carefully, use the protective case correctly, and clean the LED lens after installation.
Step 1: Open the Front Cover
First, open the front cover.
Inside, you'll see an orange latch marked with lock and unlock symbols. Turn the latch to the left (unlocked) position.
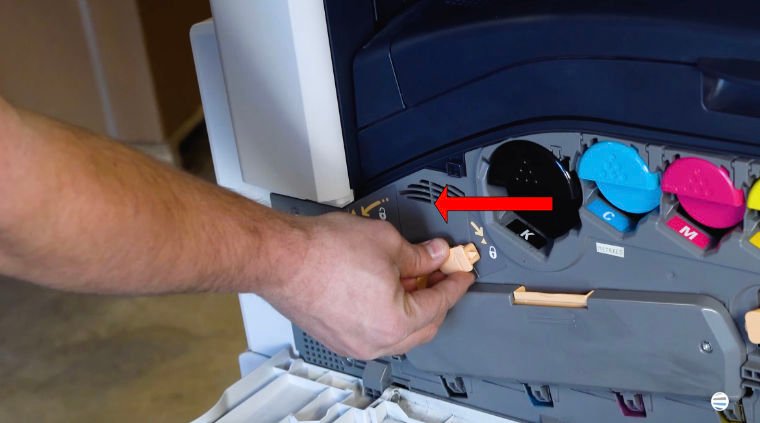
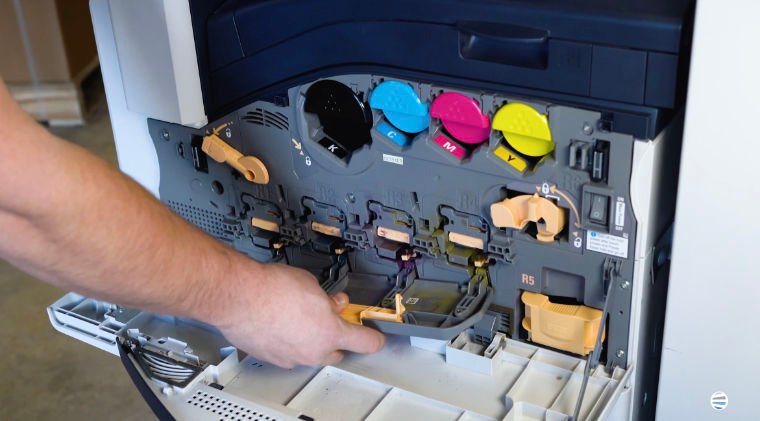
To access the drum units, press down on the orange button located above the drum door. Once the door unlatches, lower it until it lies flat.
Step 2: Locate the Drum You're Replacing
Locate R1 if you’re replacing the black drum on the C8000 Series.
The C8000 also has R2, R3, and R4 drums for the three colors.
Make sure you've identified the correct drum before removing anything.
Step 3: Remove the Old Drum
Locate the orange tab on the drum and push it upward to unlock the unit.
Then, pull the drum straight toward you.
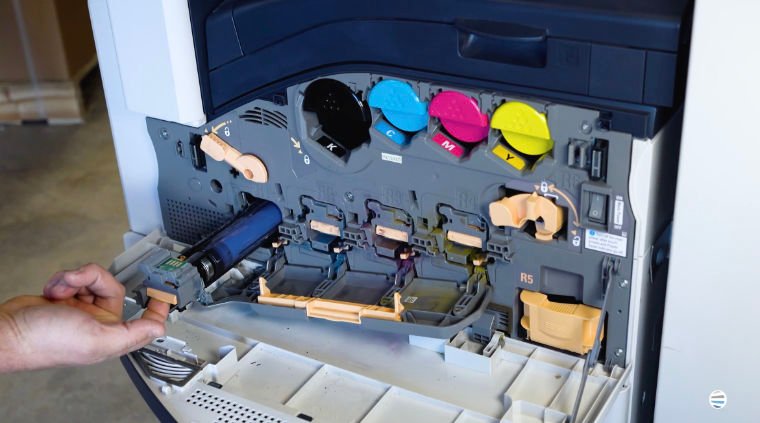
Place one hand underneath the drum for support as you remove it. This gives you better control and makes it easier to avoid accidentally touching the imaging surface.
Note: Do not touch, scratch, or nick the drum surface. Damage or contamination on this area can affect print quality.
Step 4: Unbox the New Drum
Remove the drum from the box and take off the silver wrapper. You'll notice that the new drum remains inside a black protective case.
Don't remove that case yet.
The protective case helps you install the drum without unnecessarily exposing its sensitive surface to light or accidentally damaging it during handling.
Step 5: Align the Protective Case With the Copier
Look at the end of the black protective case. You'll find two small teeth.
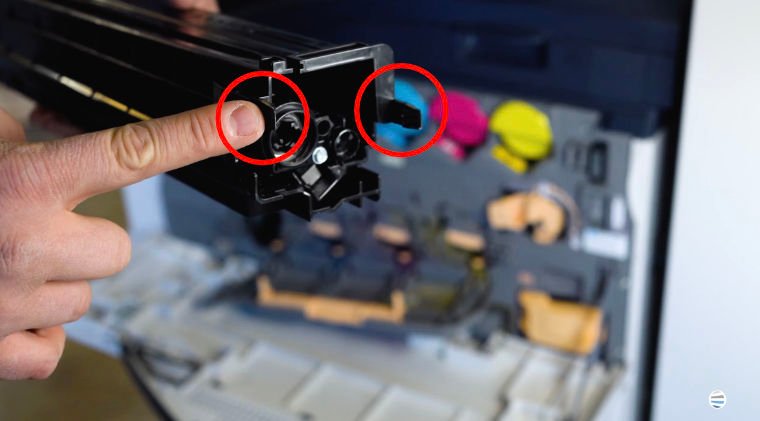
The copier has two corresponding holes near the drum opening.
Align the teeth with these holes and insert them into place. This positions the protective case correctly so the new drum can slide into the machine.
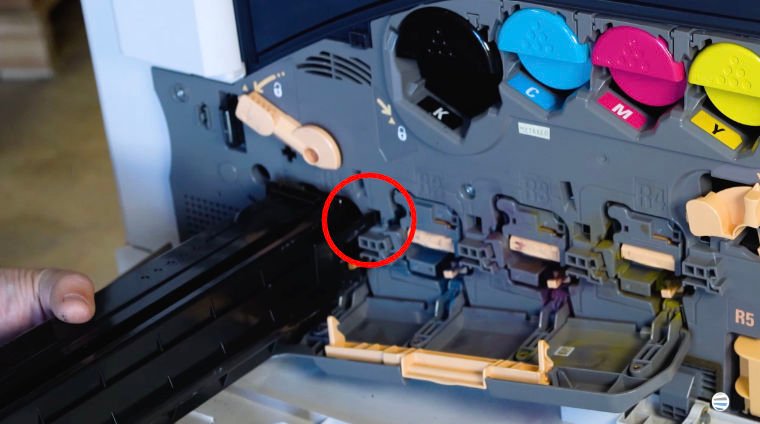
If the case doesn't line up easily, double-check the alignment rather than forcing it.
Step 6: Insert the New Drum
Once the protective case is properly positioned, use the orange handle to push the new drum into the machine.
Slide it inward until it stops.
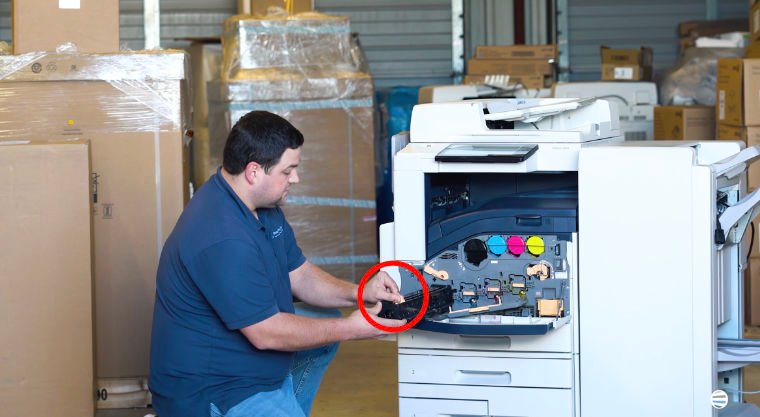
You can then remove the black protective case and finish pushing the drum into position. Continue until the drum is fully seated and you feel or hear it latch.
Step 7: Clean the LED Lens
After installing the drum, clean the LED lens located underneath it.
Locate the thin orange cleaning rod below the drum you just replaced.
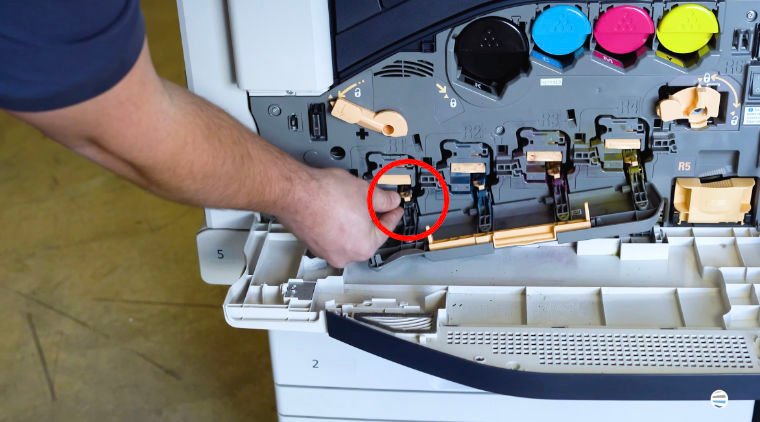
Carefully pull the rod straight out and push it back in gently. Repeat this about three times to clean the lens surface.
Once you've completed the cleaning process, make sure the rod is pushed completely back into place.
Step 8: Close and Lock the Drum Door
With the new drum installed and the LED lens cleaned, close the drum door.
Lock the drum door and return the orange latch to its locked position.
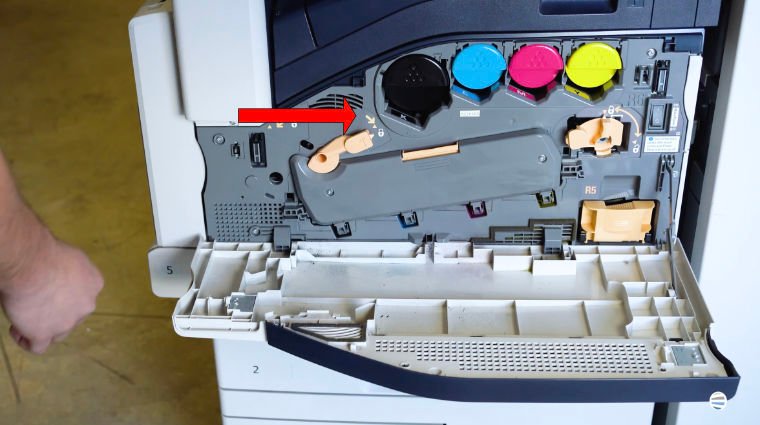
Finally, close the front cover.
Your drum replacement is now complete, and your copier should be ready to return to normal operation.
Common Drum Replacement Mistakes to Avoid
Touching the Drum Surface
Avoid touching the imaging surface with your hands. Fingerprints, scratches, or other damage can affect the quality of your prints.
Removing the Protective Case Too Early
The black case protects the new drum during installation and helps limit its exposure to light. Keep it in place until the drum has been partially inserted as demonstrated.
Forcing the Drum Into the Machine
Use the teeth on the protective case and the corresponding holes on the copier to guide the drum. If something doesn't align correctly, stop and reposition it rather than forcing it.
Skipping the LED Lens Cleaning
Cleaning the LED lens is part of the replacement process. Running the cleaning rod through approximately three times helps clean the lens before you resume printing.
Forgetting to Relock the Machine
Make sure the drum door and orange latch are securely locked before closing the front cover.
Quick Recap
- Open the front cover.
- Unlock and lower the drum door.
- Identify the drum that needs replacement.
- Unlock and carefully remove the old drum.
- Unbox the replacement while keeping it in its protective case.
- Align the case with the corresponding holes.
- Slide the new drum in and remove the protective case.
- Fully seat the drum until it latches.
- Clean the LED lens about three times.
- Close and lock the drum door and front cover.
FAQ
Is drum replacement the same on the Xerox AltaLink B8000 and C8000 Series?
Yes. The drum replacement process demonstrated on the C8000 Series also applies to the B8000 Series, although the number and type of drums differ between monochrome and color models.
Which drum is R1 on the Xerox AltaLink C8000?
R1 is the black drum. The C8000 Series also uses R2, R3, and R4 for its three color drums.
Can I touch the surface of a new drum?
No. Avoid touching or damaging the drum surface because doing so can negatively affect print quality.
Why does the new drum come in a protective case?
The black protective case helps protect the drum from light and physical damage while you install it.
Why should I clean the LED lens after replacing a drum?
Cleaning the LED lens is part of the drum replacement procedure. Use the built-in orange cleaning rod about three times before closing the machine.
Proper Drum Replacement Helps Protect Your Print Quality
Replacing a drum correctly matters because the drum plays a direct role in creating every page your copier prints. Careful handling helps protect its sensitive surface, while proper alignment and installation ensure the new drum is securely seated inside the machine.
Don't rush the process. Keep the new drum protected during installation, avoid touching its surface, clean the LED lens, and make sure everything is securely locked before closing the copier. These small steps can help you get the best performance and print quality from the replacement drum.
For more Xerox maintenance tutorials and quick fixes from experienced technicians like Matthew, subscribe to The Printing Workshop on YouTube.
You'll get access to more step-by-step tutorials and practical printer maintenance tips to help keep your equipment running smoothly.
