 Skip to main content

Toner replacement is one of those things you have to do when you own a printer. Thankfully, Xerox makes it easy, and the VersaLink C400/C405 models are no exception.
Toner is what your printer uses to create text and images. As you print, that supply gradually runs out. When the toner reaches the end of its usable life, the printer will alert you that the cartridge needs attention or replacement. You may also notice faded output if the toner is running very low.
At Strategic Technology Partners of Texas (STPT), our technicians work with Xerox equipment every day, so replacing cartridges like these is routine when keeping customers’ printers running reliably.
In this guide, Matthew from The Printing Workshop, a printer technician with several years of hands-on repair experience, will show you how to replace toner on a Xerox VersaLink C400 or C405. This process also applies to the B400 and B405.
By the end of the article, you will know where the toner cartridges are located, how to remove the old cartridge, what the different gears on replacement cartridges mean, and how to install the new toner correctly.
Table of Contents
- What Does Toner Do?
- When Should You Replace Toner?
- How to Replace Toner on a Xerox VersaLink C400 or C405
- What Do the White Gears on the Toner Cartridge Mean?
- Common Toner Replacement Mistakes
- Quick Recap
- FAQ
- Why Proper Toner Replacement Matters
Short Answer: Toner Replacement on Xerox VersaLink C400/C405
To replace toner on a Xerox VersaLink C400 or C405, open the front cover, locate the cartridge you need to change, squeeze its handle and pull it straight out, unbox the replacement, insert it right-side up, push it firmly into place, and close the front cover until it clicks.
What Does Toner Do?
Toner is the powdered material a laser printer uses to create text and images on the page.
The toner cartridge stores that powder and supplies it to the printer’s imaging system during each print job. As more pages are printed, the cartridge gradually empties and eventually needs to be replaced.
The Xerox VersaLink C400 and C405 use separate toner cartridges for each color, so you only need to replace the cartridge that has run low or reached the end of its life.
When Should You Replace Toner?
You should replace toner when your Xerox VersaLink C400 or C405 tells you that a cartridge is empty or needs replacement.
The printer monitors its toner supply and will typically provide a warning as the cartridge gets low. Waiting until the cartridge is empty may eventually interrupt printing, so keeping a replacement available can help reduce downtime.
Low toner may also lead to faded or lighter output, although a printer message is usually the clearest sign that replacement is needed.
How Do You Replace Toner on a Xerox VersaLink C400 or C405?
Replacing the toner involves opening the front cover, removing the correct cartridge, and sliding the replacement straight into the same opening. Keep reading to see the exact steps.
Step 1: Open the Front Cover
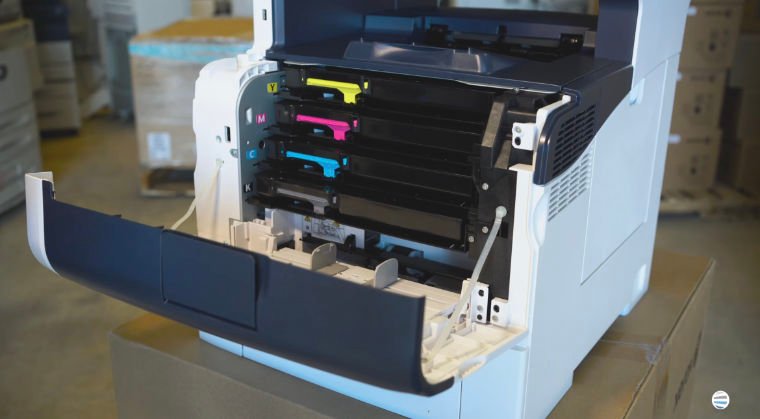
Start by opening the front cover of the printer.
The toner cartridges are positioned directly behind this cover.
Once the cover is open, all of the toner cartridges should be visible.
Step 2: Locate the Toner Cartridge You Need to Replace
Identify the cartridge that needs replacement.
In Matthew’s demonstration, he replaces the black toner cartridge, which sits at the bottom and has a black handle.
Make sure you select the correct color before removing anything.
Step 3: Remove the Old Toner Cartridge
To remove the cartridge, squeeze the handle and pull the toner straight out of the printer.
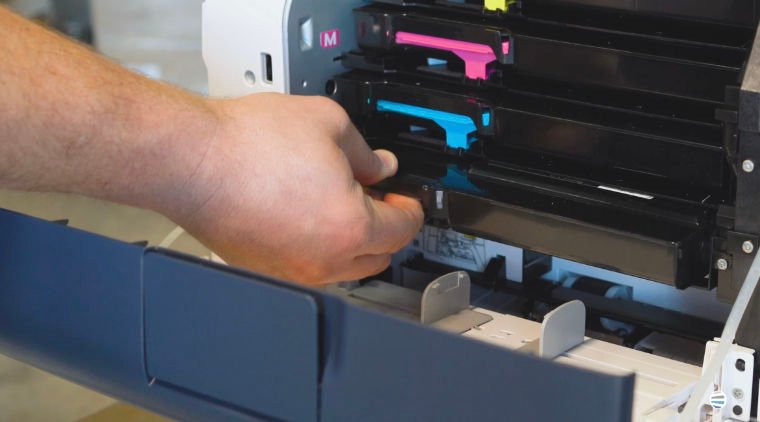
Avoid twisting or angling the cartridge unnecessarily. Pulling it directly toward you helps it move cleanly out of its slot.
Step 4: Unbox the New Toner Cartridge
Open the replacement toner box and remove the new cartridge.
Be careful when opening the packaging so you do not accidentally damage the cartridge itself.
What Do the White Gears on the Toner Cartridge Mean?
You may notice that some replacement toner cartridges have one white gear on the side, while others have three white gears.

According to Matthew, this difference simply reflects a difference in toner capacity.
The gears operate the augers inside the cartridge that help move toner through the unit. A cartridge with a different number of visible gears can still work correctly as long as it is the proper toner for your Xerox VersaLink C400 or C405.
Step 5: Position the New Toner Right-Side Up
Hold the replacement toner right-side up and position it directly in front of the opening for that color.
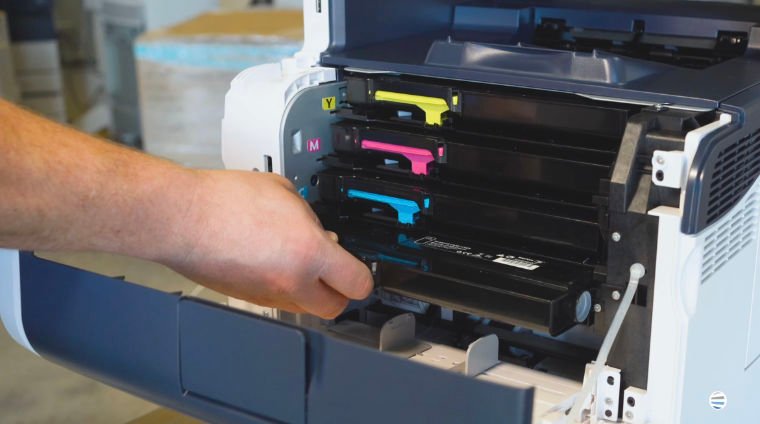
Proper orientation matters because the cartridge is designed to follow a specific path into the machine.
If it doesn’t line up easily, check the direction of the cartridge before applying more pressure.
Step 6: Push the New Toner Into Place
Slide the cartridge straight into the printer.
The toner can sometimes require a little pressure as it goes in. That can be normal.
Push firmly and evenly until the cartridge is fully seated. Avoid twisting or forcing it at an angle.
Step 7: Close the Front Cover
Once the toner is fully installed, close the front cover.
Push the cover until you hear or feel it click securely into place.
Your toner replacement is now complete, and the printer should be ready to resume normal operation.
Common Toner Replacement Mistakes to Avoid
Pulling the Cartridge Out at an Angle
Use the handle and pull the cartridge straight toward you. Twisting can make removal more difficult.
Replacing the Wrong Color
Check the printer message and cartridge position before removing toner so you replace the correct one.
Assuming Different White Gears Mean the Cartridge Will Not Work
One cartridge may have one visible gear while another has three. As Matthew explains, this can simply indicate a different toner capacity.
Installing the Cartridge Upside Down
Keep the replacement right-side up and line it up with the opening before pushing it in.
Not Seating the Cartridge Completely
The cartridge may take some firm pressure to install. Make sure it is pushed all the way into place before closing the front cover.
Quick Recap
- Open the front cover.
- Locate the toner cartridge that needs replacement.
- Squeeze the handle and pull the old cartridge straight out.
- Unbox the new toner.
- Keep the replacement right-side up.
- Slide it straight into the correct opening.
- Push until it is fully seated.
- Close the front cover until it clicks.
FAQ
Where is the toner on a Xerox VersaLink C400 or C405?
The toner cartridges are located directly behind the front cover of the printer.
Where is the black toner cartridge?
The black toner is positioned at the bottom of the toner section and has a black handle.
How do I remove the toner cartridge?
Squeeze the cartridge handle and pull it straight out of the printer.
Why does one toner cartridge have more white gears than another?
The number of visible white gears can vary with toner capacity. The gears operate internal augers that move toner through the cartridge.
Why is the new toner difficult to push in?
The cartridge may require some firm pressure to seat completely. Make sure it is properly aligned and right-side up before pushing harder.
How do I know the toner is installed correctly?
The toner should sit fully inside its slot, and the front cover should close and click securely into place.
Replacing Toner Correctly Helps Keep Printing Reliable
Toner replacement may be a simple maintenance task, but installing the cartridge correctly still matters. A properly seated toner cartridge supplies the printer with the toner it needs and helps you avoid unnecessary errors or interruptions.
The main things to remember are to remove and insert the cartridge in a straight motion, keep the replacement correctly oriented, and make sure it is fully seated before closing the cover. Those few steps can help you get back to printing without turning a routine toner change into a bigger problem.
For more Xerox maintenance tutorials and printer tips, subscribe to The Printing Workshop on YouTube. You’ll get access to more quick, practical guides from experienced printer technicians like Matthew.
