 Skip to main content

Replacing a waste toner container on the Xerox VersaLink C400/C405 is easier than one might think.
The waste toner container collects excess toner that isn't transferred to the paper during printing. As you continue printing, the container gradually fills up. Once it reaches capacity, the printer will notify you that it needs to be replaced. Replacing it on time helps prevent toner buildup inside the printer and allows your VersaLink to continue operating normally.
At Strategic Technology Partners of Texas (STPT), our technicians help businesses throughout North Texas keep their printers running reliably while minimizing downtime.
In this guide, Matthew from The Printing Workshop will walk you through the entire replacement process. By the end of this article, you'll know where the waste toner container is located, how to remove it safely, how to install the replacement correctly, and how to avoid some of the most common mistakes during installation.
Table of Contents
- What Is a Waste Toner Container?
- When Should You Replace the Waste Toner Container?
- How to Replace the Waste Toner Container on a Xerox VersaLink C400 or C405
- Common Mistakes to Avoid
- Quick Recap
- FAQ
- Final Thoughts
Short Answer: Waste Toner Container Replacement on Xerox VersaLink C400/C405
To replace the waste toner container on a Xerox VersaLink C400 or C405, open the right-side cover, unlock the orange lock, pull the old container straight out, align the replacement with the guide rods, push it firmly into place, relock it, and close the side cover.
What Is a Waste Toner Container?
A waste toner container collects excess toner that isn't transferred onto the paper during printing.
While the toner cartridges supply fresh toner for your documents, the waste toner container stores the leftover toner removed during the imaging process. Once it becomes full, the printer requires you to replace it before continuing normal operation.
When Should You Replace the Waste Toner Container?
You should replace the waste toner container when your Xerox VersaLink C400 or C405 displays a message indicating the container is full or needs replacement.
The printer monitors the amount of waste toner automatically, so you typically won't have to guess when it's time for a new one. Replacing the container when prompted helps prevent toner from accumulating inside the printer and keeps your device printing reliably.
How Do You Replace the Waste Toner Container on a Xerox VersaLink C400 or C405?
Replacing the waste toner container only takes a few minutes. The key is removing the old container straight out and making sure the replacement is fully seated before locking it into place.
Step 1: Open the Right-Side Cover
Begin by opening the printer's right-side cover.
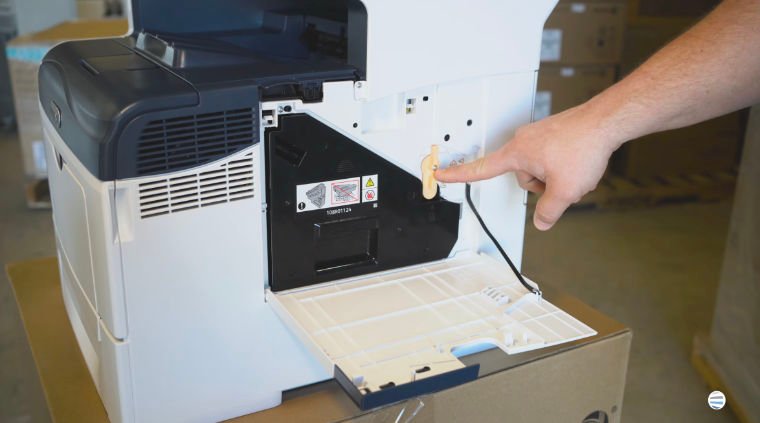
Inside the cover, you'll see a black triangular plastic component. This is the waste toner container.
Before removing it, locate the orange locking handle that secures it to the printer.
Step 2: Unlock the Waste Toner Container
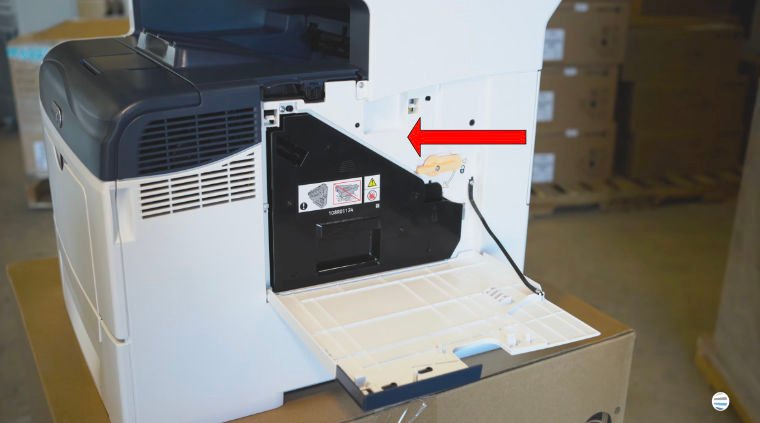
Turn the orange lock counterclockwise about one-quarter turn.
This unlocks the waste toner container so it can be removed.
Be sure the lock has fully rotated before attempting to pull the container out.
Step 3: Remove the Old Waste Toner Container
Grab the waste toner container by its handle.
Place your thumb against the white frame of the printer to give yourself a little extra leverage while pulling.
Pull the container straight out of the printer.
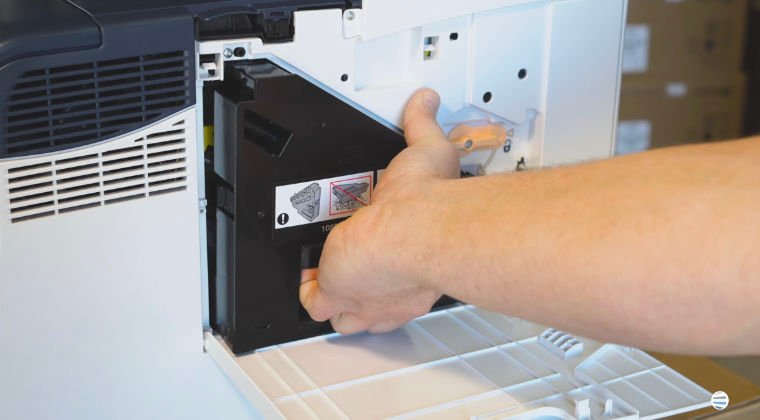
It may feel tighter than expected, especially if it has been installed for a long time. Continue pulling straight outward without twisting the container until it comes free.
Step 4: Align the New Waste Toner Container
Take the replacement waste toner container and position it in front of the opening.
You'll notice holes on the replacement container that line up with guide rods extending from the imaging unit and transfer belt assembly.
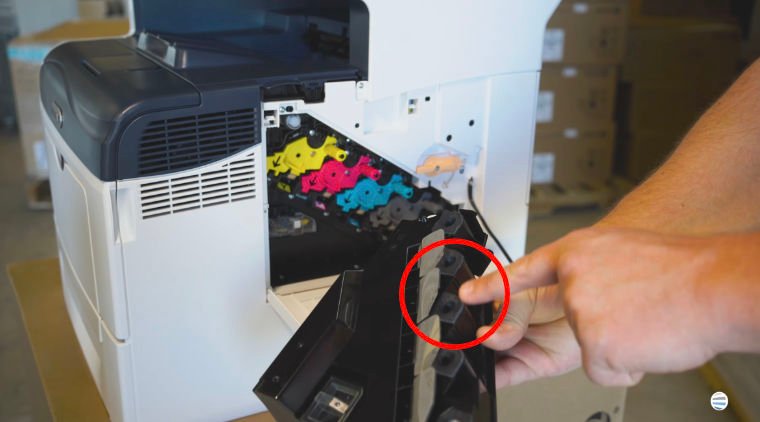
Take a moment to align those holes with the rods before pushing the container into the printer.
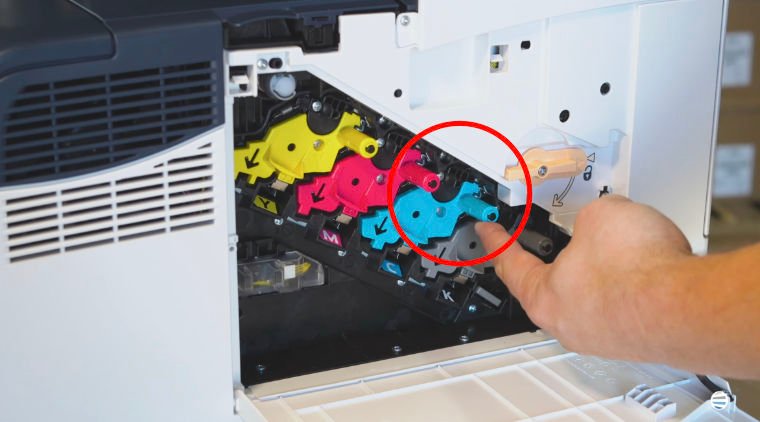
Proper alignment allows the container to slide smoothly into position.
Step 5: Push the New Container Firmly Into Place
Once everything is aligned, push the replacement container straight into the printer.
Use a firm, even push until the container is fully seated.
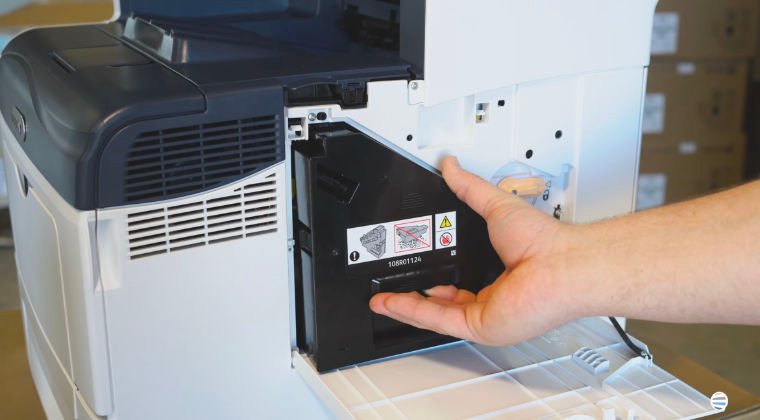
Check both the front and rear latches to make sure they sit flush. This helps confirm that the container is completely installed before locking it.
Step 6: Relock the Container
Turn the orange locking handle back into its locked position.
Locking the container secures it inside the printer and prepares the machine for normal operation.
Step 7: Close the Right-Side Cover
Close the printer's right-side cover.
Once the cover is closed, your Xerox VersaLink C400 or C405 should recognize the new waste toner container, and you'll be ready to continue printing.
Common Waste Toner Container Replacement Mistakes
Although replacing the waste toner container is straightforward, a few simple mistakes can make the process more difficult.
Forgetting to Unlock the Orange Handle
The container won't come out until the orange lock has been turned counterclockwise.
Pulling at an Angle
Always pull the container straight toward you. Twisting it can make removal harder.
Not Aligning the Guide Holes
Before pushing in the replacement, make sure the holes on the container line up with the guide rods on the printer.
Not Fully Seating the Container
After installation, verify that both the front and rear latches sit flush before locking the orange handle.
Forgetting to Relock the Container
Always return the orange lock to its locked position before closing the side cover.
Quick Recap
- Open the right-side cover.
- Turn the orange lock counterclockwise.
- Pull the old waste toner container straight out.
- Align the replacement with the guide rods.
- Push the container firmly into place.
- Verify both latches are flush.
- Relock the orange handle.
- Close the right-side cover.
FAQ
What does the waste toner container do?
The waste toner container stores excess toner removed during the printing process.
Where is the waste toner container located?
It is located behind the printer's right-side cover and appears as a black triangular plastic component.
Why is the waste toner container difficult to remove?
It's normal for the container to require a firm pull. Using your thumb against the printer frame for leverage can make removal easier.
How do I know the replacement is installed correctly?
The guide holes should align with the guide rods, both front and rear latches should sit flush, and the orange handle should lock securely.
Do I need tools to replace the waste toner container?
No. The waste toner container is designed to be replaced without tools.
Proper Waste Toner Container Replacement Helps Keep Your Printer Running Smoothly
Replacing the waste toner container correctly helps your Xerox VersaLink C400 or C405 continue operating reliably. Simply align the replacement properly, seat it completely, and secure the locking handle to help prevent unnecessary printer errors and keep toner contained where it belongs.
At STPT, we've helped businesses maintain Xerox printers for decades, and simple maintenance procedures like this often make the difference between a quick fix and avoidable downtime.
Want More Xerox Maintenance Tutorials?
For more Xerox how-to videos, troubleshooting guides, and printer maintenance tips, subscribe to The Printing Workshop on YouTube.
Subscribe today for more step-by-step tutorials from experienced Xerox technicians and keep your printers running at their best.
